Tuesday, 13 March 2018

Removing nodes from a Nutanix cluster and add them to another one


Like most of us who use Nutanix we started off small. Today we have 60+ nodes across several clusters. One of these clusters houses production and development workloads. This has served us well but as the environment continues to grow I want to separate the cluster in a dedicated cluster for production and another one for development. Also, it will give me the opportunity to re-ip the cluster easily, which is a requirement that the security team has tasked me with. Furthermore it will allow me to settle on a certain model node and minimize having a mixture of different nodes.

The current cluster exists out of 19 nodes. 14 of those are used for development workloads and 5 for production workloads. The outcome is to have 4 nodes as dedicated production cluster. Another 4 are getting on a bit but have plenty of space and will become a dedicated backup cluster at our remote site. And the 11 remaining nodes will be added to another existing but dedicated development cluster.

As with everything Nutanix there should be no disruptions but it still made me somewhat nervous as this particular production workload is the most important system we have. You can only do one node at a time and it can be time consuming.

  1. You cannot place host in maintenance mode as the CVM needs to remain powered on so manually migrate VM to other nodes in cluster
  2. There is a chance that DRS will place VM on the node you are trying to evacuate so you may want to change the setting to manual or partial
  3. Run a NCC check to make all is in order.
You want to unmount the datastore from the node and you will find that the datastore will not unmount. Reason for this is that the datastore is being used a heartbeat datastore. You can just disable HA on the cluster. There are several ways you can do the unmounting of the datastores. I prefer to do it via PRISM.

  • Go to Storage > Table and select the datastore. Click update
  • Select Mount/Unmount on the following ESX hosts and deselect host in question.


  • Click OK when prompted.
Now the datastores are unmounted you can proceed with removing the nodes from the cluster

  • Go to Hardware > Table and select your host.Click remove host.
  • Click OK when prompted


  • The removal process will start and you can follow progress under tasks. This is a time consuming process.


  • Once the process is complete you should see a decrease in available dataspace and the host will be no longer visible.
Before we add the node to the new cluster we want to remove it from the virtual distributed switch (assuming you used one) and remove host from vCenter.

Expanding the cluster is fairly easy through PRISM but I ran into a few issues so to speak. This was due to the fact that I had to re-ip the node while adding it to cluster.

  • Before starting the process set the ESXi root password to the default nutanix/4u password
  • In my case I assigned the new IP to the ESXi host as well as the IPMI interface
  • Under the gear icon click expand cluster. The node you have removed previously should be discovered.


  • Scroll down and enter new IP


    Note: At this point I ran into an error but that was fixed by a 'genesis restart' and start process again. The genesis.out file should give you a good indicator
  • Select the hypervisor needed and expand cluster.


  • The process kicks off and took approx. 60 minutes to complete


  • You should notice on the main PRISM page that you have an extra node and that your storage has increased.
  • Go to Storage > Storage Container. Select the applicable datastores and moun them to new host. You can do this by selecting datastore and clicking the update link. Select mount/unmount on following ESXi hosts and select IP address of new host.
  • Last thing to do on the Nutanix cluster is to update licensing. On the original cluster, go to the gear icon > Licensing. Click Update license and generate cluster summary file
  • In the portal select the cluster UUID and click on actions button. Click reclaim and upload summary file and click generate.
  • Go back to original cluster and upload the newly generated license file.
  • On the cluster where you added node, click on the licensing violation banner at top and update license. Generate license and go to support portal once again. Select the correct cluster and choose add node under actions.
  • Upload the cluster summary file and generate a new license file. On the cluster apply the new license
And that is it! You can now add your node to vCenter and configure as required


Thursday, 27 April 2017

Create and deploy AHV images

In this post I will explain how to make an AHV image, or template, that you can use for future deployments of VM on your AHV cluster. The first thing I will do is upload some ISO files so we can use them to build our VM.
  • Log into PRISM and select Image Configuration under the gear icon
  • Click upload image

  • Enter a name and annotation
  • Set Disk Type to iso
  • Select a destination datastore and select ISO file


  • Click Save and the upload procedure will start
  • Click close on the confirmation window
  • Repeat for other ISO
In this example we will be building a Windows 2012 R2 VM. The first thing you will need to do is download the VirtIO driver from the Nutanix portal. Once this has been done you will need to upload it to the Image Configuration as explained above. Without this driver you will not be able to install your Windows OS.
  • Go Home > VM > Create VM
  • Assign  a name as well as your desired compute details

  • Select the CD Rom and click the pencil icon
  • Set operation to "Clone from Image Service" and select the image you created previously

  • Add a second CD Rom and assign the VirtIO iso to it

  • Next we add another disk and this one is for the purpose of our VM's system disk
  • Set operation to "Allocate on container". Specify desired container and size

  • Last thing you will need to when creating a VM is adding a NIC. Click "Add new NIC" button. Assign it to correct VLAN


At this point we are ready to install the operating system. Power on the VM and follow the Windows screen prompts until you reach the screen for where to install Windows
  • Click Load Driver

  • Browse to the mounted virtio iso and select the folder for your OS
  • Select the drivers to install

  • You can now select the disk you added during VM creation process

  • Complete the Windows install
Now you can customize the windows install to your liking. I recommend you snapshot your VM before starting sysprep as this makes it easy to revert your changes.

  • From the command prompt in the C:\Windows\System32\Sysprep directory run the 'sysprep /generalize /shutdown /oobe' command. This will start the sysprep process.

  • The VM will shutdown once the process is complete.
You now have an image that you can clone or import in the image configuration so you can use it for future deployment of VM.

The image configuration does not allow for a VM to be imported through its GUI but you can do so via the acli
  • SSH into one of your CVM and go to acli interface. Enter the vm namespace
  • Retrieve the listing of your VM with vm.list command
  • Retrieve disk information from your vm with vm.disk_get <vmname>

  • To create an image we will be using the image.create command from the acli interface. You will need to specify the vmdisk_uid you retrieved above
  • Run the command  image.create "Template Windows2012 R2" clone_from_vmdisk=a74820ad-209d-4cee-8001-555bc1ab3647 image_type=kDiskImage
  • Run image.list and you should image listed.
  • In PRISM you can see that the image is listed in the Image Configuration GUI

  • Now when we deploy a new VM we will need to add a disk and specify to clone from image service and pick our new image

  • Configure the rest of the settings, such as network, to your liking
  • Enable the custom script checkbox and enter your sysprep script. I am not going into detail here about sysprep scripts but you can quickly generate one, as I did for this exercise, with the Windows Answer File Generator website


  • Power on your VM and launch its console.
  • All going well your VM should be customized according to your script.
If you are looking to clone VM rather than using image configuration you follow a similar process.
  • Select the VM you want to clone
  • Click on the clone link
  • Specify the amount of clones you want and a name. The other fields will be populated with the details of the machine you are cloning.

  • You can re-use the sysprep script again if you desire and click save
  • The process will start and in no time you will have your clones deployed

In a future post I will be re-utilizing my image for deployment with the Nutanix Self Service Portal

Friday, 14 April 2017

Nutanix Self Service Restore (SSR)

The self service restore functionality in Nutanix has been around for a while but was driven from the cli until the release of AOS 5.0. Users will now have the ability to restore files and folders for themselves through a web interface that is accessible via a shortcut on their desktop.

Obviously you will need something to restore from and that would be your snapshots. It is assumed that you have a protection domain configured and that your VM is being protected. In  addition to that you will need to install the Nutanix Guest Tools onto your VM.

The self service restore is supported on both ESXi and AHV but my instructions are based on AHV and a Windows 2012 R2, which is only one of several supported OS.

  • Log into PRISM and go to Home > VM menu
  • Select your VM from the table and click the Mange Guest Tools link
  • Select all the options. This will require an empty cd-rom slot. Click submit

  • Log into your VM and click the setup installer from mounted cd-rom
  • Once the installer is finished you should see a shortcut on the desktop


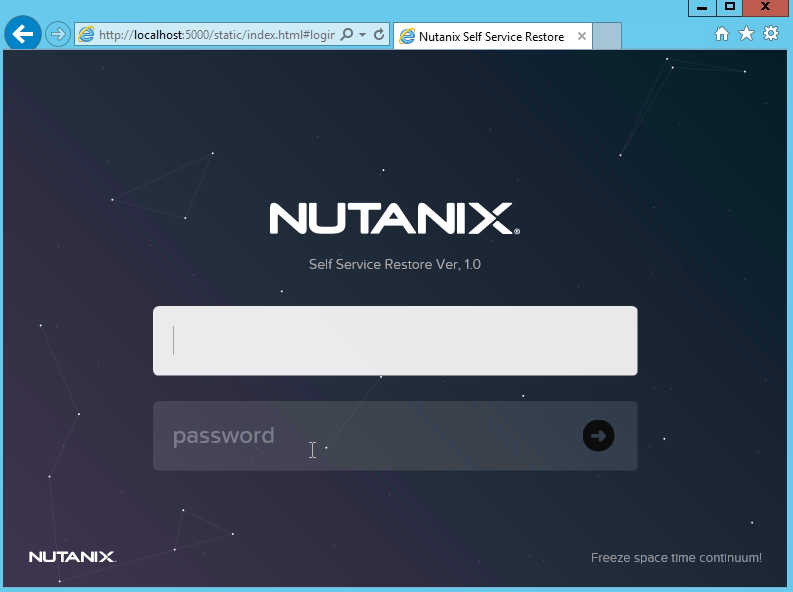
  • Click shortcut and this will take you to the restore portal


  • Log in with your username and password. You will see the available snapshots

  • Click the snapshot you want to restore from. Select the disk and from disk action menu select mount. The disk will appear as mounted

  • Go into Windows explorer and you will notice that the snapshot is mounted under G: drive. 
  • This will allow you to copy files over from snapshot.Once done go back to portal and select the disk under mounted snapshots.

  • Click unmount and you are finished. Snapshots will auto unmount after 24 hours


Friday, 2 December 2016

Win a Nutanix Xpress Platform

X-mas has arrived early this year! Well at least for whoever will be the lucky winner.
Nutanix is giving away a Nutanix Xpress Platform that comes fully loaded with a 1 year support and software license, as well as many other prices.

Some time back I saw a web seminar on the Xpress Platform and I would love to have one for myself. Unfortunately I do not qualify myself as it is open only to new SMB customers and you have to be US based. Hopefully most of you do qualify so hurry up and enter to win.

So what is included in the Xpress platform?


  • AHV Hypervisor and PRISM Management
  • Quick and easy deployment within 60 minutes
  • Simplified management
  • No pesky hypervisor licesning costs
  • Non-disruptive upgrades with zero downtime
  • Integrated local, remote and cloud backup

The platform hardware specs are as follows:

  • 3 nodes with 16 cores CPU, 64 GB of Memory, 480 GB SSD and 4 TB HDD Storage
  • Xpress software edition
  • 1 year Nutanix support


Wednesday, 30 November 2016

Copying files to Azure Storage Blob


I was assigned a SR today to move files from a local server onto  Azure Blob storage.
The web application is being moved to Azure and I needed a way to move the files to the container created as part of the application setup. Initially I investigated Microsoft Azure Storage Explorer . I liked the look of it but had some issues with it. I had to transfer nearly 8000 folders and the app seem to crash if I dragged in more than 30 at a time.


After some searching I came across AZCopy  and this did the trick. Its usage is straight forward. You download it as part of the Microsoft Azure Storage tools package.


Once installed you start the Microsoft Azure Storage Command Line from your Start menu.


I wanted to ensure the nearly 8,000 folders and 38,000 files got copied over and I did this with the following command

AzCopy /Source:C:\myfolder /Dest:https://myaccount.blob.core.windows.net/mycontainer /DestKey:key /S


Replace key with the key specified on your Azure storage account


You can now browse your blob container and all folders should be there


Friday, 25 November 2016

Expand your Nutanix Cluster

One of the things I like most about AOS is the one click functionalities that make my life easier. Upgrading AOS or the hypervisor is something I get to do on a regular basis, other functions not so much. Some time back I got to use the convert cluster functionality and you can read more about it here. Another one click option I wanted to try out for a while is the expand cluster one. A fresh shipment of NX-1065 arrived so this presented me with a great opportunity to try it out.

You have racked the nodes and you have configured your network ports. The requirements are the same as when using the foundation applet or foundation VM. One thing that has caught me out once or twice before with re-imaging is that I connected all my network cabling upfront. In my case that is a 1 Gbps for IPMI and 2 x 10 Gbps for all my management and data networks. Ensure you disconnect your 10 Gbps cabling and only connect your IPMI connection to the shared 1 Gbps network port.

The expand procedure is quite straightforward:

  • Log in to PRISM and go to gear icon
  • Select expand cluster. On the screen tick boxes of nodes you want to add. Enter the required IP for CVM and hypervisor


  • Select the hypervisor version you want to use


  • Click the run checks button and the pre-check will start.


  • When done expand cluster.


  • Just sit back and wait for everything to complete
Once the nodes have been added you still have a bit of clean up work to do. One of the things I think that can be improved is the option to set the hypervisor hostname. You will that it will appear in PRISM with a default hostname such as the ones below


I want my hostnames to be consistent so I will need to change a few things

  • SSH into your ESXi host
  • Change hostname with 'esxcli system hostname set --fqdn <name>' command
  • Restart genesis on all nodes 'allssh genesis restart genesis'
  • You may also want to execute service hostd restart on your ESXi nodes

Although the nodes are added to the cluster, the ESXi hosts will not automatically mount the existing datastores. This can be easily done via PRISM though.

  • Go to Home > Storage > Table > Container
  • Select the datastore and click update
  • Make sure mount/unmount ESXI hosts is selected
  • Tick the box next to the new host and click save

One other thing I'd like to see build into the Expand cluster wizard is the ability to set CVM size. Currently it will be done with the default which caused dedupe to be disabled on the cluster. Here is the fix:

  • Shut down the CVM with 'cvm_shutdown -P now' command
  • Change the RAM size to what is required for dedupe. You wan the CVM memory sizes in your cluster to be conssitent
  • Power on CVM
  • SSH into CVM
  • Run edit-zeus --editor=vim
  • Remove the line that says "disable_on_disk_dedupe: true"
  • Save the file and quit vim
At this point I am ready to make some changes in vCenter. I want to ensure that I am making use of 10 Gbps networking and that my vmk and CVM are running on my distributed switches. I won't be going into much detail on this but the Add and Manage Hosts wizard is your friend.

The last thing I had to clean up is some red herring alerts I got from PRISM. It will tell you that the 1 Gbps interfaces are down. You can fix this by following the steps in this KB

And that is pretty much it. I have used this process a few times now with ESXi and AHV and I think it is fantastic!


Saturday, 6 August 2016

In-Place Hypervisor Conversion from ESXi to AHV

It has been nearly 3 years since we bought our first Nutanix block. The NX-1465 was used in a ROBO location to provide some backup services for the main datacentre at the head office. Due to infrastructure changes this block started to see less and less use and a fine piece of equipment such as this is wasted when only hosting a handful of VM. Having found an alternative solution for these VM, I decided to convert this cluster to Acropolis Hypervisor. It will allow me to come to grips with a different hypervisor and also give us the ability to test some of the AOS features such as File Services and Containers.

Rather than destroying cluster and rebuild I wanted to see how good the conversion utility worked. Looking at the documentation it became clear that it is not a matter of just pressing the button, there are a few requirements to adhere to. Since the ESXi cluster was attached to a distributed switch I had some cleaning up to do. vDS is not supported so I migrated all physical adapters and vmk interfaces to a freshly created standard switch. Only one external vSS is supported btw. I also deleted my vMotion interface from my setup. Once all my networking met the requirements I removed the nodes and cluster from vCenter all together. I actually did not see this as a requirement in the documentation but it made sense to me as it is most likely cleaner.

I also was keen to see how well it would convert a virtual machine. I made sure I left a Windows 2012 R2 VM behind that was created from our standard template. One requirement for this is the install of the Nutanix Guest Tools. NGT is somewhat like VMware tools and provides enhanced functionality for the VM. It is key to AMF (App Mobility Fabric) and installs features such as file level restore, VSS Copy and Nutanix guest agent.

Install Nutanix Guest Tools


  • Go to table view under VM
  • Select your VM and enable NGT. You will be prompted to continue


  • This will mount the iso so log on to your VM and click setup under the CD-Rom drive


  • Agree to EULA and select install.
  • You will be prompted to install Python


  • Follow the bouncing ball


  • The mobility drivers will be installed as part of the installer


  • The setup is now complete

Nutanix has a video available that shows the above steps but it also shows how to install NGT on a Linux VM.

Before starting the actual conversion process I also deleted my existing protection domains and snapshots. Not sure if this was needed but seemed like a good idea.


Convert Cluster

  • Go to the gear icon and select Convert Cluster


  • Select the hypervisor and take note of the warnings


  • All going well you should get message that conversion was succesful


  • Click convert cluster to get started. A warning message will appear. Click yes


  • The conversion will start


  • Some progress bars will appear


At this point I was wondering if something was actually happening as I did not see any progress. After about 50 minutes I got kicked of the session and things went black for a wee while. Then things started happening and a progress screen appeared.


After 90 minutes the conversion appeared to be complete as indicated by this screen after logging in


Everything appeared to be in order with the system but I did get A1082 alerts for a while. The funny thing here was that they actually referred to vmnic while Acropolis names the interfaces Eth. I opened a job with support and this appears to be a red herring. The alerts appeared to have stopped about a day after conversion.

T
he system seemed to be just fine but what about the VM? It appeared in the list of VM's but I ran into a problem when trying to boot the VM. It was stuck at the boot disk as shown here.

It appears that the issue was caused by the fact that the original VM made use of EUFI boot. AHV does not support EUFI apparently with certain versions but it looks like it will be fixed in 4.7.1. I will be upgrading soon and hopefully that will kick the VM into life. It would have been good if the conversion process would have picked up on this non-compatibility beforehand.
I now have an AHV cluster and can't wait to get cracking. WIll spend some quality time with the best practices guide now. Expect to see some more posts on AHV soon.