Nutanix Cloud Connect is part of the Nutanix data protection functionality and therefor is as easy to manage as it was a remote Nutanix cluster. Your remote Nutanix cluster is a single ami instance in EC2. A m1.xlarge instance is automatically deployed when you configure the remote site. EBS is used to store the metadata while S3 is used for the backup storage.
One of the Nutanix clusters I maintain holds about 12 TB worth of data. Currently this is being backed up by an enterprise backup solution which relies on enterprise class storage and it turns out to be a bit expensive.
I am stating the obvious here but to get started you will need a Nutanix cluster running a NOS version that supports Cloud Connect and an AWS account. I will also assume you have a working VPN connection between your site and a VPC dedicated for Nutanix Cloud Connect services. Further more, your Nutanix cloud instance will have access to the internet so that it can access aws.amazon.com.
I have tried this configuration by making use of SSH and it works but Nutanix clearly states it is not intended for production purposes as it can lead to a 25% performance decrease.
AWS Configuration
User configuration
- Log into AWS and go to Access and Identity Management
- Under users, click create new users
- Enter a meaningful name such as "NutanixBackup" and ensure that the "Generate access key for each user". Store credentials in your password safe.
- Attach an access policy for this user. I have made use of the AdministratorAccess policy for this demo but you probably want to lock it down even more
Network configuration
As the emphasis here is on Nutanix Cloud Connect I will go over the network configuration at a high level. I created a dedicated VPC that will I will be using for future workloads in AWS.
Although I only have my Nutanix CVM in this subnet I have decided to make it big enough so it caters for future growth. Currently only backing up to AWS is supported but I have been told that Cloud Connect will support DR in the future which I believe interpret as bringing up VM within the cloud providers datacenter. I also created a dedicated internet gateway. The CVM instance makes use of S3 storage and does so over http so internet access is required. And finally, my routing table is populated with routes that exist in the on-prem datacenter. These routes make use of the virtual gateway that is associated with my VPC connection. I added a default route of 0.0.0.0/0 to my route table and pointed this to the internet gateway. This will ensure that the connection to S3 goes via the internet gateway.
Although I only have my Nutanix CVM in this subnet I have decided to make it big enough so it caters for future growth. Currently only backing up to AWS is supported but I have been told that Cloud Connect will support DR in the future which I believe interpret as bringing up VM within the cloud providers datacenter. I also created a dedicated internet gateway. The CVM instance makes use of S3 storage and does so over http so internet access is required. And finally, my routing table is populated with routes that exist in the on-prem datacenter. These routes make use of the virtual gateway that is associated with my VPC connection. I added a default route of 0.0.0.0/0 to my route table and pointed this to the internet gateway. This will ensure that the connection to S3 goes via the internet gateway.
Cloud Connect Configuration
Having your AWS configuration in place it is now time to configure cloud connect. You can do this either via the PRISM GUI or via the Nutanix powershell cmdlets.
Credentials configuration
- Log in to PRISM and select Data Protection from the Home menu
- On the right-hand side, choose remote site. Select AWS
- Add the credentials previously created in AWS

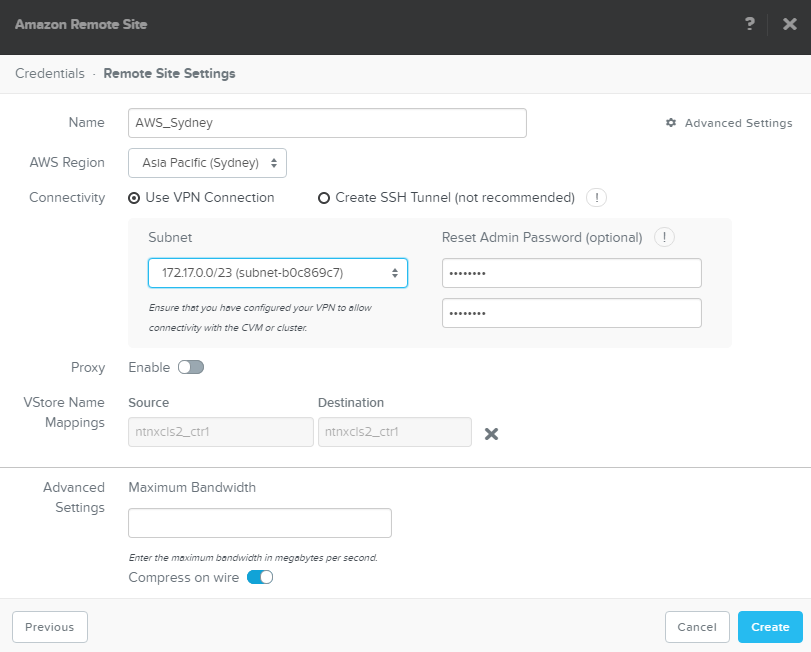
Remote site configuration
- Click next (as in the above screenshot)
- Set the region where you deployed CVM and the subnet will be detected
- Reset the admin password of the Nutanix CVM instance
- Click add next to the vStore Name mapping

- Click create and the process will start

- It will take a while for the process to complete
- Once the install is complete you can test your connectivity to AWS. Under Data Protection > Table, Select your remote site and click test connection. All going well you should see a green tick
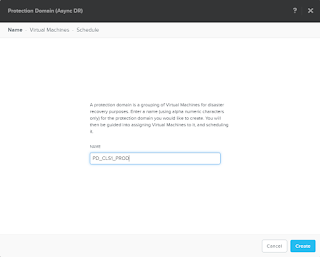
- Now that you have connectivity it is time to setup some protection domains. Click the green "+Protection Domain" and select Async DR.
- Enter a name for your protection domain and click create
- Select VM to protect
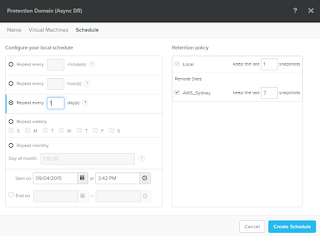
- Create a new schedule
- Set the frequency and enable your remote site. You will also need to specify your retention


Monitor your replications
- Go Home > Data Protection. Here you will see several tiles displaying active data. In this example you can see that I have 1 remote site, 2 outbound replications and I am getting speeds around the 32 MBps mark.

- Select the table link at the top. Here you see a list of all the protection domains
- Under the replication tab you will see the ongoing, pending and completed replications


I did run into some issues while implementing backup to AWS. On a few occasions I noticed that my transferred bandwidth came to a stand still. The first time I got around it by rebooting the CVM instance in AWS. When it occurred again I involved Nutanix support and they found that the AWS CVM was running out of memory and basically crashed the CVM. The solution was to upgrade the AWS instance to a m2.2xlarge instance.


