- Log into PRISM and select Image Configuration under the gear icon
- Click upload image

- Enter a name and annotation
- Set Disk Type to iso
- Select a destination datastore and select ISO file

- Click Save and the upload procedure will start
- Click close on the confirmation window
- Repeat for other ISO


In this example we will be building a Windows 2012 R2 VM. The first thing you will need to do is download the VirtIO driver from the Nutanix portal. Once this has been done you will need to upload it to the Image Configuration as explained above. Without this driver you will not be able to install your Windows OS.
At this point we are ready to install the operating system. Power on the VM and follow the Windows screen prompts until you reach the screen for where to install Windows
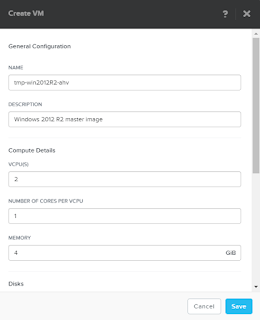
- Go Home > VM > Create VM
- Assign a name as well as your desired compute details
- Select the CD Rom and click the pencil icon
- Set operation to "Clone from Image Service" and select the image you created previously

- Add a second CD Rom and assign the VirtIO iso to it

- Next we add another disk and this one is for the purpose of our VM's system disk
- Set operation to "Allocate on container". Specify desired container and size

- Last thing you will need to when creating a VM is adding a NIC. Click "Add new NIC" button. Assign it to correct VLAN


At this point we are ready to install the operating system. Power on the VM and follow the Windows screen prompts until you reach the screen for where to install Windows
- Click Load Driver

- Browse to the mounted virtio iso and select the folder for your OS
- Select the drivers to install

- You can now select the disk you added during VM creation process

- Complete the Windows install


Now you can customize the windows install to your liking. I recommend you snapshot your VM before starting sysprep as this makes it easy to revert your changes.
- From the command prompt in the C:\Windows\System32\Sysprep directory run the 'sysprep /generalize /shutdown /oobe' command. This will start the sysprep process.

- The VM will shutdown once the process is complete.

You now have an image that you can clone or import in the image configuration so you can use it for future deployment of VM.
The image configuration does not allow for a VM to be imported through its GUI but you can do so via the acli
- SSH into one of your CVM and go to acli interface. Enter the vm namespace
- Retrieve the listing of your VM with vm.list command
- Retrieve disk information from your vm with vm.disk_get <vmname>

- To create an image we will be using the image.create command from the acli interface. You will need to specify the vmdisk_uid you retrieved above
- Run the command image.create "Template Windows2012 R2" clone_from_vmdisk=a74820ad-209d-4cee-8001-555bc1ab3647 image_type=kDiskImage
- Run image.list and you should image listed.
- In PRISM you can see that the image is listed in the Image Configuration GUI

- Now when we deploy a new VM we will need to add a disk and specify to clone from image service and pick our new image

- Configure the rest of the settings, such as network, to your liking
- Enable the custom script checkbox and enter your sysprep script. I am not going into detail here about sysprep scripts but you can quickly generate one, as I did for this exercise, with the Windows Answer File Generator website

- Power on your VM and launch its console.
- All going well your VM should be customized according to your script.


If you are looking to clone VM rather than using image configuration you follow a similar process.
- Select the VM you want to clone
- Click on the clone link
- Specify the amount of clones you want and a name. The other fields will be populated with the details of the machine you are cloning.

- You can re-use the sysprep script again if you desire and click save
- The process will start and in no time you will have your clones deployed


In a future post I will be re-utilizing my image for deployment with the Nutanix Self Service Portal


