Saturday 26 September 2015

Nutanix cmdlets and PowerCLI One Liners and then some [Updated]

I really like powershell but I never used it to its full potential. A recent change in job role sees me more involved in the day to day stuff so I started brushing up on my coding skills. I will be sharing some of the code I find useful. I still consider myself a novice so don't expect anything fancy but please share your thoughts, I would love to learn from your experiences.

Stop a protection domain replication


This one liner returns all replications
Get-NTNXProtectionDomainReplication | Select ProtectionDomainName, ID
The above command will return the name and ID of the replication. You will need to specify these when you want to stop the replication
Abort-NTNXProtectionDomainReplication -ProtectionDomainName PD1 -ID 1234567

Using PowerCLI and vSphere tags for VM lifecycle


VM sprawl can get seriously out of control. I recently deleted 50 VM in an environment after it appeared they were no longer required or worse, nobody knew what they were used for. Read More

Find unprotected VM on your Nutanix cluster


This one liner returns which VM are currently not protected.
Get-NTNXUnprotectedVM | Select vmName

List protected VM in a protection domain


This one liner lists all VM in a given protection domain
Get-NTNXVM  | where {$_.protectiondomainame -eq "My_PD"} | Select vmname

Add unprotected VM to a protection domain


This one liner adds a VM to a protection domain
Add-NTNXProtectionDomainVM  -name "My_PD" -names "VM1"

Remove protected VM from a protection domain


This one liner removes a VM from a protection domain
Remove-NTNXProtectionDomainVM  -name "My_PD" -input "VM1"

Configuring the scratch partition


Configure the scratch partition of your ESXi host when making use of a SD install Read More
Disclaimer: Please use examples at your own risk. I take no responsibility for any possible damage to your infrastructure.

Saturday 19 September 2015

Nutanix Cloud Connect: Backup to AWS

One of the cool features in NOS is Nutanix Cloud Connect which allows you to integrate your on-premises Nutanix cluster with public cloud providers. At the time of writing there is only support for Amazon Web Services but I have been told support for Microsoft Azure is in the works.
Nutanix Cloud Connect is part of the Nutanix data protection functionality and therefor is as easy to manage as it was a remote Nutanix cluster. Your remote Nutanix cluster is a single ami instance in EC2. A m1.xlarge instance is automatically deployed when you configure the remote site. EBS is used to store the metadata while S3 is used for the backup storage.

One of the Nutanix clusters I maintain holds about 12 TB worth of data. Currently this is being backed up by an enterprise backup solution which relies on enterprise class storage and it turns out to be a bit expensive.

I am stating the obvious here but to get started you will need a Nutanix cluster running a NOS version that supports Cloud Connect and an AWS account. I will also assume you have a working VPN connection between your site and a VPC dedicated for Nutanix Cloud Connect services. Further more, your Nutanix cloud instance will have access to the internet so that it can access aws.amazon.com.

I have tried this configuration by making use of SSH and it works but Nutanix clearly states it is not intended for production purposes as it can lead to a 25% performance decrease.

AWS Configuration

User configuration

  • Log into AWS and go to Access and Identity Management
  • Under users, click create new users
  • Enter a meaningful name such as "NutanixBackup" and ensure that the "Generate access key for each user". Store credentials in your password safe.
  • Attach an access policy for this user. I have made use of the AdministratorAccess policy for this demo but you probably want to lock it down even more

Network configuration


As the emphasis here is on Nutanix Cloud Connect I will go over the  network configuration at a high level.  I created a dedicated VPC that will I will be using for future workloads in AWS.
Although I only have my Nutanix CVM in this subnet I have decided to make it big enough so it caters for future growth. Currently only backing up to AWS is supported but I have been told that Cloud Connect will support DR in the future which I believe interpret as bringing up VM within the cloud providers datacenter. I also created a dedicated internet gateway. The CVM instance makes use of S3 storage and does so over http so internet access is required. And finally, my routing table is populated with routes that exist in the on-prem datacenter. These routes make use of the virtual gateway that is associated with my VPC connection. I added a default route of 0.0.0.0/0 to my route table and pointed this to the internet gateway. This will ensure that the connection to S3 goes via the internet gateway.

Cloud Connect Configuration


Having your AWS configuration in place it is now time to configure cloud connect. You can do this either via the PRISM GUI or via the Nutanix powershell cmdlets.

Credentials configuration


First thing we need is to add the user and its credentials you have created in AWS.
  • Log in to PRISM and select Data Protection from the Home menu
  • On the right-hand side, choose remote site. Select AWS
  • Add the credentials previously created in AWS


Remote site configuration


  • Click next (as in the above screenshot)
  • Set the region where you deployed CVM and the subnet will be detected
  • Reset the admin password of the Nutanix CVM instance
  • Click add next to the vStore Name mapping


  • Click create and the process will start


  • It will take a while for the process to complete


  • Once the install is complete you can test your connectivity to AWS. Under Data Protection > Table, Select your remote site and click test connection. All going well you should see a green tick


  • Now that you have connectivity it is time to setup some protection domains. Click the green "+Protection Domain" and select Async DR.
  • Enter a name for your protection domain and click create


  • Select VM to protect
  • Create a new schedule
  • Set the frequency and enable your remote site. You will also need to specify your retention


Monitor your replications


  • Go Home > Data Protection. Here you will see several tiles displaying active data. In this example you can see that I have 1 remote site, 2 outbound replications and I am getting speeds around the 32 MBps mark.


  • Select the table link at the top. Here you see a list of all the protection domains
  • Under the replication tab you will see the ongoing, pending and completed replications


I did run into some issues while implementing backup to AWS. On a few occasions I noticed that my transferred bandwidth came to a stand still. The first time I got around it by rebooting the CVM instance in AWS. When it occurred again I involved Nutanix support and they found that the AWS CVM was running out of memory and basically crashed the CVM. The solution was to upgrade the AWS instance to a m2.2xlarge instance.

Sunday 13 September 2015

Re-image Nutanix block with ESXi


Your Nutanix block has made it all the way to the central North Island of New Zealand and you have unpacked the block, took the box for a ride around town and installed the block into the rack. Your new Nutanix block is factory shipped with the KVM hypervisor but your environment's hypervisor of choice is VMware ESXi. This is were Nutanix Foundation comes in. In a previous post I explained how to install the Nutanix Foundation VM. This post will cover how to re-image your nodes.


Once you have logged into your Foundation VM you need to click the Nutanix Foundation icon which make use of the Firefox icon.


This will take you to the Foundation GUI. This interface will walk you through the following 4 steps:
  1. Global Config
  2. Block and Node Config
  3. Node Imaging 
  4. Clusters


Global Config


The global configuration screen allows you to specify settings which are common to all the nodes you are about to re-image. At the bottom you see a multi-home checkbox. This only needs to be checked when your IPMI, hypervisor and CVM are in different subnets. Since it is best practice to keep these in the same subnet it is advised you do and thus there is no reason to tick the box.
In this case you will enter the same netmask and gateway. For IPMI, enter the default ADMIN\ADMIN credentials. You can change this later. Enter your organisational  DNS server under hypervisor. You probably make use of another DNS server and you can add this one later too.
The CVM memory can be adjusted as required. In my case this is 32 GB


Block and Node Config


The block and node config screen allows you to discover the new nodes. Remember that your Foundation VM needs to have an IP in the same subnet as the new nodes and that IPv6 needs to be supported. The new block and its new nodes should be automatically detected if all pre-requisites have been met. If not, you can try the discovery again by clicking the retry discovery button.

Enter the IP addresses you want to use for the IPMI, hypervisor and CVM interfaces for each discovered node. You can also set the desired name for your hypervisor host


Node Imaging


The node imaging allows you to specify the NOS package and hypervisor you want to use for re-imaging your node. You should ensure that the NOS and hypervisor version you specify is the same as the ones in use on your cluster. It is not strictly necessary but it makes life a bit easier. You will need to upload your NOS and hypervisor installer files to the Nutanix Foundation VM. By default, there is enough disk space available on the foundation VM to hold at least one of each. It is important that the files are stored in the correct location on the VM. You can upload them from your laptop to the VM with the following SCP commands:

scp -r <NOS_filename> nutanix@foundationvm:foundation/nos
scp -r <hypervisor_filename> nutanix@foundationvm:foundation/isos/hypervisor/<hypervisorname>


Clusters


As I am actually not creating a cluster but planning to expand an existing one I do not specify a new cluster. I do click the run installation button and I get a message that informs me the imaging will take around 30 minutes.


The installer will kick off once you click the proceed button.


Just sit back and wait for the process to complete.


Tuesday 8 September 2015

Migrating virtual machine networking from an inconsistent virtual distributed switch

Redundancy is great and a must in every design but occasionally things happen that are unforeseen.
Last week we had a situation where some end of life TOR switches were due for replacement. The first switch was removed and everything kept ticking as expected. The standby adapter on the virtual switches took over as expected. Unknown to the network engineer undertaking the work, one of the power supplies on the secondary switched had failed. Unfortunately for him he knocked the second power supply cable and all connectivity to the underlying storage was lost. The power was quickly restored and switch rebooted and most of the VM escaped unscathed.


The SQL cluster holding the vCenter database was not so lucky. It lost access to all its underlying ISCSI disks and unfortunately that meant loss of access to the vCenter database. Even though connectivity to the database was reasonably quickly restored it was not until a day later that problems became noticeable. A particular VM was no longer networking and upon inspection it became clear the network adapter's connected property was unchecked. Not a biggie one would think and all you have to do is check the box. Unfortunately this did not work and vCenter presented the following error: Invalid Configuration for Device '0'


not an actual picture of my error. I found this in the public domain.


Trying to find a solution to this problem I came across this article on the VMware KB. In this article several work arounds were explained option 1 did not work although we had some success with option 3:


Option 3

  1. SSH to the host and determine the VMID for the affected virtual machine using the command:

    vim-cmd vmsvc/getallvms | grep -i VMNAME
  2. Use the VMID from the command in step 1 to reload the configuration on the host by running the command:

    vim-cmd vmsvc/reload VMID
  3. Edit the settings of the virtual machine and connect the NIC.

It soon became clear there were all kinds of other issues. vMotioning, cloning or restoring from backup became pretty much impossible. When looking at the virtual distributed switch I noticed that it was in a warning state and that several of the hosts vDS configuration were out of sync with the vCenter vDS settings.


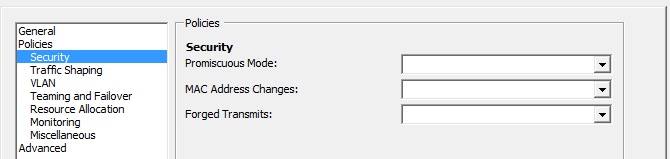
Looking further into the distributed vswitch configuration it was noticed that all settings were "null".
The vlan id had disappeared, the uplinks were set to unused, etc. Obviously this was not truly the case as every VM and VMkernel were still on the network.


One of the possible solutions I came accross was to do a manual sync. vCenter has an option called "Rectify vNetwork Distributed Switch on Host" which allows you to manually bring the vDS back in sync.


As this did not work as a solution I decided to open a support request with VMware. After repeating most of the above and submitting the usual logs I was advised that I had to rebuild the virtual distributed switch; something I had been contemplating doing. 

So how do you go about migrating virtual networking between two virtual distributed switches while avoiding any outages? You can make use of the migrate virtual machine network wizard.

First step is to create a new vDS. You will need to give it a different name than your existing switch. Also, ensure that its configuration is exactly the same. You would not want to leave off a port group or assign an incorrect vlan id for example. I am assuming that you have two uplinks to your existing virtual distributed switch. In my case I make use of one active and one standby uplink on each virtual port group. Having these two uplinks will ensure you do not lose connectivity as we will need to disconnect one uplink.  

  1. Go to Networking and select the inconsistent virtual distributed switch
  2. Under Configuration, select manage hosts. Click the desired host
  3. On the adapter screen deselect your primary uplink


  4. Click next on the following screens and accept defaults.
  5. Go to the newly created virtual distributed switch configuration screen
  6. Click Add host
  7. Select the same host as you selected in step 2
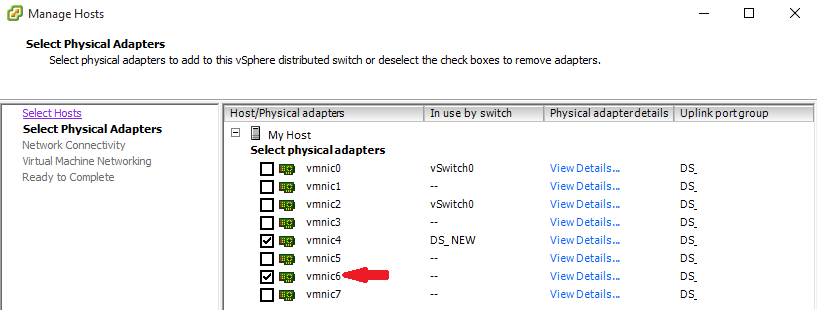
  8. Select the adapter you deselected in step 3. The standby link will still reflect the name of the current switch.


  9. Under the new virtual distributed switch, select manage hosts. Click the host you selected in step 2/7


  10. You'll notice the adapter you moved in stap 8 in selected. It now states it is in use by the new switch. You also notice that the other NIC is still in use by the old switch. Click Next


  11. Migrate your NFS and Vmotion vmk to the new switch.Click Next, accept other defaults and finish


  12. On the new vDS, select manage hosts once more. Click next until you get to Virtual machine Networking screen. Enable the check box
  13. Set the destination ports on the new vDS. Click Next and finish


  14. Add the remaining NIC to the new vDS. Go to the old switch and click manage hosts. Select the host and click next
  15. Deselect the NIC and click next.
  16. A warning will appear informing you that no physical adapters are selected for one or more hosts. Click yes. Click next on all screens and finish


  17. On the new vDS, click manage hosts. Select your host and click next
  18. Select the NIC you deselected in step 15. click next and finish


  19. Go to old vDS and select hosts tab. Remove from the virtual distributed switch


  20. Accept the warning about removing selected hosts from vDS
  21. Delete the old switch

I could have probably done this in fewer steps but choose not too as I had never attempted this before. You should be able to move NIC, VMK and VM in one go but I had no opportunity to test this.


Friday 4 September 2015

Install Nutanix Foundation 2.1

In a nutshell: "Foundation 2.1 allows the customer/partner to configure the network parameters, install any hypervisor and NOS version of their choice, create the cluster, and run their production workload within a few hours of receiving the Nutanix block."

For some more info on Nutanix Foundation have a look at this post by Andre Leibovici and the Foundation:Then, Now and Beyond post on the Next Community.

So now you know what Foundation is how do you go about installing it? The Foundation software is available to Nutanix partners and its rumoured it will become available to customers too. The software is delivered as a virtual appliance. The .tar file contains the following files:

  • Foundation_VM-2.1.mf
  • Foundation_VM-2.1.ovf
  • Foundation_VM-2.1-disk1.vmdk

I will be making use of  Oracle Virtualbox to run the appliance on my laptop. You can download virtualbox at https://www.virtualbox.org/wiki/Downloads. Once virtualbox is installed you can import the Foundation_VM-2.1.ovf. Set the network to bridged.

  • Power on the VM by clicking the green start arrow


  • Once the VM is powered on you will see the user account listing. Click Nutanix user.


  • Enter nutanix/4u as the password and click log in


  • Click the set_foundation_ip_address icon on the desktop


  • With device configuration selected, click enter


  • Here you can opt to choose between a DHCP or static address. DHCP is the default


  • Click OK and Save + Quit. Likewise you can change the DNS configuration by selecting this option
  • Click the Nutanix Foundation icon on the desktop.


This is were all the magic starts and I will talk about that in a future post.


Thursday 3 September 2015

Upgrade NOS via PRISM

One of the things I like most about Nutanix is its simplicity and it does not get much simpler then the one-click upgrade that allows you to keep your NOS up to date. The process of upgrading NOS is very similar to upgrading PRISM Central which I wrote about in a previous post.

Before upgrading NOS you should always run a ncc health check to see if their are any issues and if you do come across an issue then you can fix it or contact Nutanix support. You can run ncc by logging into a CVM and run the following command: ncc health_checks run_all

NOS is upgraded via your PRISM interface. Once you logged in you will need to click the gear icon in the top right-hand corner. Select upgrade software. Here is where you can not only upgrade NOS but also your hypervisor, firmware and NCC. 

Under NOS, click the download button. This could take a while to complete


Once downloaded a blue upgrade button appears. This will also give you the option do a pre-upgrade.


We will run the pre-upgrade first. This will check whether all the pre-requisites have been met.
This is actually done as part of the upgrade too so feel free to skip.

.

At the bottom click back to versions button and select upgrade > upgrade now. The pre-upgrade will run again and the upgrade will commence after that has completed.


The process will upgrade each CVM and you should see this when complete


If you return to the upgrade software window you will see it reflects the latest version


And that is it. All in all it took about 25 minutes to do a 4-node cluster. Time to upgrade the next one...