Friday, 4 September 2015

Install Nutanix Foundation 2.1

In a nutshell: "Foundation 2.1 allows the customer/partner to configure the network parameters, install any hypervisor and NOS version of their choice, create the cluster, and run their production workload within a few hours of receiving the Nutanix block."

For some more info on Nutanix Foundation have a look at this post by Andre Leibovici and the Foundation:Then, Now and Beyond post on the Next Community.

So now you know what Foundation is how do you go about installing it? The Foundation software is available to Nutanix partners and its rumoured it will become available to customers too. The software is delivered as a virtual appliance. The .tar file contains the following files:

  • Foundation_VM-2.1.mf
  • Foundation_VM-2.1.ovf
  • Foundation_VM-2.1-disk1.vmdk

I will be making use of  Oracle Virtualbox to run the appliance on my laptop. You can download virtualbox at https://www.virtualbox.org/wiki/Downloads. Once virtualbox is installed you can import the Foundation_VM-2.1.ovf. Set the network to bridged.

  • Power on the VM by clicking the green start arrow


  • Once the VM is powered on you will see the user account listing. Click Nutanix user.


  • Enter nutanix/4u as the password and click log in


  • Click the set_foundation_ip_address icon on the desktop


  • With device configuration selected, click enter


  • Here you can opt to choose between a DHCP or static address. DHCP is the default


  • Click OK and Save + Quit. Likewise you can change the DNS configuration by selecting this option
  • Click the Nutanix Foundation icon on the desktop.


This is were all the magic starts and I will talk about that in a future post.


Thursday, 3 September 2015

Upgrade NOS via PRISM

One of the things I like most about Nutanix is its simplicity and it does not get much simpler then the one-click upgrade that allows you to keep your NOS up to date. The process of upgrading NOS is very similar to upgrading PRISM Central which I wrote about in a previous post.

Before upgrading NOS you should always run a ncc health check to see if their are any issues and if you do come across an issue then you can fix it or contact Nutanix support. You can run ncc by logging into a CVM and run the following command: ncc health_checks run_all

NOS is upgraded via your PRISM interface. Once you logged in you will need to click the gear icon in the top right-hand corner. Select upgrade software. Here is where you can not only upgrade NOS but also your hypervisor, firmware and NCC. 

Under NOS, click the download button. This could take a while to complete


Once downloaded a blue upgrade button appears. This will also give you the option do a pre-upgrade.


We will run the pre-upgrade first. This will check whether all the pre-requisites have been met.
This is actually done as part of the upgrade too so feel free to skip.

.

At the bottom click back to versions button and select upgrade > upgrade now. The pre-upgrade will run again and the upgrade will commence after that has completed.


The process will upgrade each CVM and you should see this when complete


If you return to the upgrade software window you will see it reflects the latest version


And that is it. All in all it took about 25 minutes to do a 4-node cluster. Time to upgrade the next one...


Wednesday, 12 August 2015

Nutanix Community Edition on nested ESXi without SSD


"Community Edition is a 100% software solution enabling technology enthusiasts to easily evaluate the latest hyperconvergence technology at zero cost. Users can now experience the same that powers the datacenters of thousands of leading enterprises around the world."

I am fortunate that I get to use Nutanix in the workplace. Unfortunately I do not have the luxury to have a Nutanix cluster in a lab environment. When I first came across Nutanix I did inquire whether there was a virtual appliance which would allow me to "play" around with the technology. Fast forward two years and Nutanix Community Edition allows me to do just that!

Last year I was lucky enough to visit Nutanix HQ in San Jose and had the honor of having a meeting with the dude himself, Steven Poitras. This is were I first heard about Acropolis and was very excited about what this had to offer. My employer is a big user of VMware so I will not be getting an opportunity to use Acropolis any time soon. Nothing wrong with VMware and since my employer is an educational institution we do get a good price on VMware licensing.

Being a Nutanix advocate I still want to learn about Acropolis and it seems Nutanix CE will allow me to do just that! After registering for the BETA I proceeded with the image download and looking over the hardware requirements. According to the documentation the minimal requirements are as follows:


As I was just doing an exercise in refreshing hardware I had plenty of kit to choose from. One small problem, there were no SSD drives available nor did I have the budget to buy some. I recalled reading something once about tagging virtual drives as SSD and when I started googling I came across this post by Michael Webster. It was very similar to what I wanted to achieve. I also like to recommend Joep Piscaer excellent post on how to run Nutanix CE on fusion.

The development  lab I make use of is based on vSphere 5.5 instead of version 6. I also wanted to start of with a single node cluster as I am definitely not after performance and just wanted to test Acropolis functionality.

The host I ended up using was a HP DL380 G7 with dual CPU, 144 GB of RAM, a 72 GB volume and an additional 2.7 TB volume.And no SSD drives!

The install process was pretty straightforward and these are the steps I followed:
  • Download the Nutanix CE installer and extract files from the ce-2015.07.16-beta.img.gz file
  • Rename the ce-2015.07.16-beta.img to ce-2015.07.16-beta-flat.vmdk
  • Log in to your vSphere Web Client and go to vCenter > Storage
  • Upload the descriptor file ce.vmdk. Here is an example of one you can modify
  • Create a new VM. Ensure you set its compatibility to ESXi 5.5 and later. Choose CentOS version 4/5/6/7 64-bit as the Operating System

  • Create a new portgroup that allows for Promiscious Mode. I called it NTNX CVM
  • Adjust the hardware settings:
    • Change vCPU to 4 and the RAM to 16 GB
    • Change the network adapter to E1000
    • Set network to the port group you have created
    • Set SCSI adapter to Paravirtual
    • Delete the default virtual disk

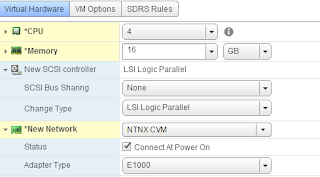
  • Under New Device, select Add Existing Hard Drive. Add the existing ce.vmdk to ISCSI 0:0
  • Add another new hard disk (500 GB) and assign it to ISCSI0:1. This will function as my SSD drive. 
  • Add another new hard disk (500 GB) and assign it ISCSI0:2. This will function as my HDD drive


At this stage there is one thing left to do before we can start the install and that is to trick the CVM to believe it has access to a SSD drive. This can be achieved by applying an advanced setting.

  • Go to VM > Edit Settings > VM Options > Advanced > Edit Configuration Parameters
  • Click Add Row and add the following


Now you are ready to start installing Nutanix Community Edition!

  • Power on the VM
  • Log in with login install and no password

  • Click Proceed


  • The installer will now verify whether your hardware is supported. I had some issues until I made my virtual SSD 500 GB in size
  • Enter your IP configuration for CVM and host. 
  • Check the Create single-node cluster and assign DNS address

  • Make sure you read the EULA from top to bottom or it won't work :-)
  • Click start
  • Once the installer has finished browse to https://your-cvm:9440
  • Set your password


  • Once you logged in as admin and new password you will be prompted for your NEXT credentials.
  • Ta Da!! Behold Acropolis


And with this we have finished our install. In the next post we will talk about post install configuration.


Wednesday, 5 August 2015

Configuring the scratch partition

I am currently in the process of replacing a fleet of ESX hosts with HP DL360 G9 hardware. Unlike the servers that are being decommissioned these G9 do not have local disk and ESXi will boot from a local SD card. SD devices are sensitive to high amounts of I/O and when installing ESXi the scratch partition will not be located on the SD device. Instead, the installer first scans for a local 4GB vfat partition, if it doesn’t find one it will then scan for a local VMFS volume on which to create a scratch directory. If no local vfat partition or VMFS volume is found, as a last resort the installer will put the scratch partition in “/tmp/scratch” To identify your current scratch directory you can run this one liner

Get-VMHost Host1 | Get-AdvancedSetting -name ScratchConfig.CurrentScratchLocation | Select value

Let's assume the value returned is /tmp/scratch, as is the case with my new install, then you may want to relocate it. I have created a datastore and mounted it on every new ESX host. There is a good article by Duncan Epping that explains some of his thinking around sizing. You can find it here

I have written a script that will create all the required directories on my scratch volume and it will also set the advanced setting for you. Please note that you will have to reboot your hosts for the change to take effect.

function Set-ScratchDirectory {
<#
.SYNOPSIS
    Set a scratch directory for ESX hosts
.DESCRIPTION
    Set a scratch directory for ESX hosts on shared storage
.NOTES
    Author      : Guy Defryn
    Version     : 1.1
    Date        : 4/8/2015   
.PARAMETER Host
    Specify Host to create scratch directory for
.EXAMPLE
    Set-ScratchDirectory -Hostname ESX1
    Set scratch directory for specified host
.EXAMPLE
    Import-CSV .\scratchhosts.csv | Set-ScratchDirectory
    Set scratch directory for each host 
.LINKS
    http://kb.vmware.com/selfservice/microsites/search.do?language=en_US&cmd=displayKC&externalId=1033696
.TODO
    Retrieve UUID instead of hard coding
#>
    [CmdletBinding()]
    param(
    [Parameter(Mandatory=$True, ValueFromPipelineByPropertyName=$True)][String] $Hostname

    )
    Begin{
        $Datastore = Get-datastore "scratch_vol1"
        New-PSDrive -Location $Datastore -Name ds -PSProvider VimDatastore -Root "\" | out-null
        Set-Location ds:\
    }
    Process{ 
        new-item ".locker-$Hostname" -type Directory | out-null
        Get-AdvancedSetting -Entity $Hostname -Name Scratchconfig.ConfiguredScratchLocation | Set-AdvancedSetting -Value "/vmfs/volumes/0174119b-06db5bc5/.locker-$hostname" 
        }
    End{
        Write-Host "Please reboot your host for changes to take effect" -ForegroundColor Red
    }
}

Sunday, 2 August 2015

Upgrading PRISM Central

With PRISM Central you manage all of your Nutanix clusters from a single pane of glass. It allows you to take care of your monitoring and alerting as you would do through each cluster's PRISM interface.  For those who haven't installed PRISM Central, Bas Raayman has some good instructions on his blog

PRISM Central's releases are linked to NOS and since the latest version is 4.1.4 so is PRISM Central.
Nutanix recommends to upgrade PRISM Central to the latest version and then match the NOS install on your clusters.

  • Log in to PRISM Central
  • Click on the gear icon and select upgrade Prism Central
  • Click the download button


  • Confirm the download when prompted
  • Once the download has completed click upgrade and upgrade now


  • Confirm that you want to upgrade
  • You can monitor progress while you wait


  • Once the upgrade is complete your progress monitor should look as follows


  • You are finished. You can confirm that you have latest version by selecting "About Nutanix" from the admin menu


Using PowerCLI and vSphere tags for VM lifecycle

VM sprawl can get seriously out of control. I recently deleted 50 VM in an environment after it appeared they were no longer required or worse, nobody knew what they were used for. Some of these VM were deployed a few years ago and were never used. The obvious thing to do here was to delete them. Going forward I want to ensure that all VM get reviewed on an annual basis so that they can be deleted if no longer required. One good way of identifying objects in vCenter is by making use of tags. Before you can create tags you will need to have a tag category. I created a category called "Expiry Date" and ensured that it is only applicable to virtual machines

New-TagCategory -Name "Expiry Date" -Cardinality "Single" -EntityType "VirtualMachine" -Description "Expiry Date for VM"

The idea is that I check my VM once a month and I want to retrieve a listing of all VM that expire in a given month. I will need to create a tag for each month. Additionally I want a tag that is called "No Expiry" which I will apply to the foundation infrastucture such as Active Directory servers or Nutanix CVM. I will place all tags in an array and then create a tag for each.

$Months = @("January", "February","March","April","May","June","July","August","September","October","November","December","No Expiry")

ForEach($Month in $Months){
    Get-TagCategory "Expiry Date" | New-Tag -Name $Month -Description "VM that expire in $Month"    
}


With the tags in place we can now assign them to the VM.

$Tag = Get-Tag "August"
Get-vm VM1 | New-TagAssignment -Tag 

Assigning tags one by one would have taken me a long time so I have written a function that should make life a bit easier

function Set-VMExpiry {
<#
.SYNOPSIS
    Set the Expiry month of a VM.
.DESCRIPTION
    Set the Expiry month of a VM . This will allow for determining when VM is due for review.
.NOTES
    Author      : Guy Defryn
    Version     : 1.0
    Date        : 28/7/2015   
.PARAMETER VirtualMachine
    Specify the VM to which apply expiry date
.PARAMETER Month
    Specify the month in which the VM expires
.EXAMPLE
    Set-VMExpiry -VirtualMachine VM1 -Month July
.EXAMPLE
    Import-CSV .\vmexpiry.csv | Set-VMExpiry
    Add all expiry dates as defined in the csv file vmexpiry.csv.
#>
    [CmdletBinding()]
    param(
    [Parameter(Mandatory=$True, ValueFromPipelineByPropertyName=$True)][String] $VirtualMachine,
    [Parameter(Mandatory=$false, ValueFromPipelineByPropertyName=$True)][String] $Month
    )
    Begin{
        If (!$Month) {
            $Month = get-date -Format MMMM
        }
    }
    Process{
        write-output "Setting Expiry for $VirtualMachine to $Month"
        $VM = get-vm $Virtualmachine
        $OldTag = Get-TagAssignment $VM -Category "Expiry Date"
        if($OldTag){
           Remove-Tagassignment $OldTag -Confirm:$false 
        }
        $VM | New-TagAssignment -Tag $Month | out-null
    }
    End{
    }
}

Now that we have our VM tagged with an expiry we can report on these. I have created a function that will allow to get you VM that are set to expire in given month. I also like to know which VM are not tagged so I can actually go and tag these accordingly.

function Get-VMExpiry {
<#
.SYNOPSIS
    Get a list of VM that are expiring based on month input
.DESCRIPTION
    Get a list of VM that are expiring based on month input. This will allow for determining if the VM is still required.
.NOTES
    Author      : Guy Defryn
    Version     : 1.1
    Date        : 31/7/2015   
.PARAMETER MONTH
    Specify Month to obtain list of expired VM. If not specified current month will be returned.
.PARAMETER ExportPath
    Specify the path if you want to export to CSV
.EXAMPLE
    Get-VMExpiry -Month July
    Get VM that expire in the month of July
.EXAMPLE
    Get-VMExpiry
    Get VM that expire in current month
.EXAMPLE
    Get-VMExpiry -Month "No Expiry"
    Get VM that are set to not expire
.EXAMPLE
    Get-VMExpiry -Month Unspecified
    Get VM that have no expiry date tag set
.EXAMPLE
    Get-VMExpiry -Month Unspecified -ExportPath C:\Temp\tags.csv
    Get VM that have no expiry date tag set and export it to file
.TODO
#>
    [CmdletBinding()]
    param(
    [Parameter(Mandatory=$false)][String] $Month,
    [Parameter(Mandatory=$false)][String] $ExportPath

    )
    Begin{
        If(!$Month){
            $Month = get-date -Format MMMM
        }
        $Category = Get-TagCategory -Name "Expiry Date"
        
    }
    Process{
        If($Month -eq "No Expiry"){
            write-output "VM which are not expiring"
            $Tags = get-vm -tag $Month | select Name
        }
        ElseIf($Month -eq "Unspecified"){
            write-output "VM which have no expiry date specified"
            $Tags = get-vm | Where {!(Get-Tagassignment -Entity $_ -Category $Category)} | Select Name
        }
        Else{
            write-output "VM expiring during the month of $Month"
            $Tags = get-vm -tag $Month | select Name
        }
    }
    End{
        $Tags
        if($ExportPath){
            $Tags | export-csv $ExportPath -NoTYpeInformation
        }
    }
}

Thursday, 30 July 2015

Installing Nutanix Powershell cmdlets

Before you can start making use of Nutanix Powershell you will need to install the Nutanix cmdlets that are provided in an installer. You can easily install them from your PRISM interface.

  • Log in to PRISM and click the gear icon
  • Click Download cmdlet installer to download installer
  • Start the installer 
  • Accept default path
  • Click Finish
Once the installer has finished you will need to install snapin. You can do this by running the following command:

.\InstallUtil.exe “C:\Program Files (x86)\Nutanix Inc\NutanixCmdlets\Modules\NutanixCmdletsPSSnapin.dll”

You will need to run the install.exe from the .NET directory. There are several of these depending on the .Net frameworks you have installed. In my case it was C:\Windows\Microsoft.Net\Framework\v4.0.30319

You also need to ensure that the snapin loads when you start your powershell session. Run "notepad $profile" and add the following to your powershell profile

Add-PsSnapin NutanixCmdletsPSSnapin

That should be it. Currently there are around 150 Nutanix cmdlets. Make sure you print off this very handy poster and hang it above your desk.