Wednesday, 1 October 2014

Stop and start a Nutanix cluster

I suppose that under normal circumstances one would not need to shut down a Nutanix cluster very often but I had to do it twice recently because of a network upgrade and a complete shutdown of a datacenter.

The nodes in a Nutanix cluster are not only ESXi hosts; they provide storage services as well. If you need to shut down a node or a cluster for any reason, the Nutanix software needs to be shut down properly to avoid storage-related issues.

If you are CVM making use of a vDS ensure that your system is configured with a 64 GB satadom.
If your local CVM datastore is showing up as vmfs you will be fine and there will be no impact. If you have a 16 GB satadom contact Nutanix support

This issue is only applied to certain configuration / NOS version.
When the system is configured with 16Gb satadom, local datastore is mounted as a pynfs.
You can check this by looking at the local datastore on vsphere client - if local datastore is vmfs, this means satadom is 64Gb in size and directly mounted as local datastore and there will be no impact on shutting down / starting cluster.

If local datastore is nfs and displayed size is 1Tb, then the system is using pynfs, which by default is none-persistent and will not be mounted unless vCenter is available (dvSwitch information is stored in vCenter database).

Stopping a cluster
  • Confirm autostart is enabled for all CVM
  • Shut down all VM on the Nutanix cluster except the CVM
  • SSH into any CVM and stop Nutanix cluster with ‘cluster stop’ command
  • Ensure all services are stopped on all CVM (Zeus and Scavenger will be UP and  that is fine)

 Shutting down nodes in a cluster
  • Shut down guest VM or move them to other node. You can only shut down one node in cluster If you need to shut down more than one node you will need to shut down entire cluster.
  • Log into ESX host or vCenter
  • Shut down CVM by using  Power > Shut Down Guest
  • Enter maintenance mode
  • Uncheck Move Powered Off and suspended virtual machines to other hosts in cluster.
  •  Shut down ESX node

Starting nodes in a cluster
  • Power on node(s)
  • Exit maintenance mode
  • Power on the CVMs and wait approx. 5 minutes for all services to start
  • Start Nutanix cluster with ‘Cluster start’ command
  • Confirm cluster services are running with ‘ncli Cluster status | grep –A 15 cvm_ip_address’ command
  • Ensure ESXI can see datastore
  • Verify all services are up on all controller VM with ‘cluster status’ command
  • Once all nodes are up you will get to log into each esxi host and re-enable automatic startup for the controller VM. Go to Configuration > Virtual Machine Startup/Shutdown

Sunday, 29 June 2014

Making use of your domain name with EC2 and Elastic IP

So you decided to make use of AWS EC2 to host your web server. You have uploaded your content and you can browse to it by making use of the public DNS name that is assigned by default. By default it will look something like this ec2-54-79-21-210.ap-southeast-2.compute.amazonaws.com. I don't know about you but to me that looks very messy. The DNS name reflects the IP address of your instance, in this case 54.79.21.210. So what about pointing an A record in your DNS server to this IP? Well, yes but not quite that simple. This will work as long as you don't stop your EC2 instance. An instance will change its IP address and therefor it public DNS name when you start it up again and your A record would become invalid.

AWS EC2 provides you with Elastic IP to solve this problem. An Elastic IP address is basically a static IP address that is associated with your account and not with an instance. This means you can assign the address to whatever instance until you decide to release it.


  • Log into the console and go to the EC2 service panel
  • Go to Elastic IPs under Network and Security menu. 
  • Click the blue Allocate New Address button and select Yes, Allocate


  • Your new address will be assigned to your account.

  • Select your instance to associate address.


  • You can now see that the Elastic IP is assigned to your instance under its properties.
  • In your DNS, create an A record that points to your Elastic IP. You should now be able to access your instance by making use of the name specified in the A record.
Your account is limited to 5 Elastic IP addresses and don't cost you anything as long as you use them. If you leave them unassociated you will be charged $0.01/hr.

Re-align VMDK with Netapp's MBR tools

Misaligned VMDK can be a real burden on your filer and you can bet your bottom dollar that your Netapp support engineer will ask about this first when you are experiencing issues! VMFS misalignment should not be an issue as you should always create your VMFS via vCenter and this will ensure that its aligned correctly. The alignment you need to worry about is that of the partitions in your guest OS. This is not an issue with modern operating systems such as Windows 2008 and above but in my experience there is still a fair chunk of older OS around such as Windows 2003 and their partitions are misaligned by default. So if you did not bother aligning the partitions after you consolidated your old physical fleet you will now likely have a lot of misaligned I\O.

In my workplace we make extensive use of Netapp and IBM N-Series filers and they have a neat piece of software available called VSC which allows you to re-align your VMDK. It does a lot more but we might save this for another post. I will assume you have already installed the VSC software and its plugin in vCenter.


  • Go to the VSC tab in vCenter and go to the tools menu. Download the mbrtools.tar.gz file to your workstation


  • SCP the file to your ESXi host /tmp directory
  • Extract the file and copy mbralign and mbrscan to the /usr/bin directory
  • Set the permissions for both files to 555: chmod 555 mbralign
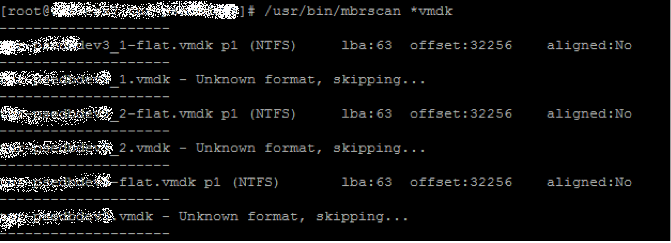
Now that we have the software in place we will need to check which of the vmdk are misaligned. This is done by making use of the mbrscan tool.

  • Change into the directory holding your VM files
  •  Check the file sizes (ls –lah). Make sure you have at least double the size of vmdk file available on the volume.
  • Run /usr/bin/mbrscan against flat.vmdk file(s). This will indicate that your VMDK is aligned or not.


Now you can continue with the alignment process itself. This is done with the mbralign tool.

  • Make sure the VM is shut down and you have removed existing snapshots. This is to avoid corruption.
  • Run /usr/bin/mbralign vmname.vmdk
  • Confirm with y
  • You will see this message indicating that the process is complete.
  • ls -la to see contents of your directory. You will notice the backup files created during this process. 
  • Remove these files: rm -rf *backup
  • Repeat this for every misaligned disk
  • Power on VM
VSC has another method for doing a batch scan for alignments. I will cover these in another post.

Friday, 27 June 2014

Getting started with AWS EC2 - Part 1

Amazon Elastic Cloud (EC2) offers web-scale computing that allows you to increase your compute capacity in a manner of minutes. This is done through the deployment of a base instance. An instance is a virtual machine in AWS speak. AWS has many instances available which come in different sizes to best suits your need. An in-depth overview can be found here.

The AWS free tier allows you 750 hours of use for one of their micro instances. These come in several Windows or Linux flavours. The t1.micro instance offers you one vCPU and 0.613 MB of RAM while storage is provided via EBS. This will do just fine for this exercise...


  • Log into the AWS console and go to EC2 Service. Select Key Pairs under Network & Security.
  • Create Key Pair and specify name. Click create button

  • The key pair is generated and a .pem file is downloaded to your workstation. This is your private key
  • Go to the instances menu on the left and click Launch Instance.
  • In step 1, pick one of the instances that are eligble for free tier.


  • Click Select. On step 2, ensure your micro instance is selected and click "Next:Configure Instance Details" button
  • In step 3, you can keep defaults and move on to the storage configuration

  • In step 4, you can keep defaults
  • In step 5, you can specify a tag which allows you to identify your server

  • In step 6 you will need to specify a security group. A security group is basically one or more firewall rules. Since this is a web server I want HTTP access. I also opened access to RDP and SQL.

  • Please note that this configuration is wide open!! You want to secure this to match your needs.
  • In step 7, you can review your settings before clicking the launch button. You will be asked to select the key pair before instance is launched.


  • Go to your instances and select the instance you have just created. Click the connect button.

  • Download the Remote Desktop File and click the Get Password button.

  • Upload your .pem file and decrypt password. You will need this password to access your windows instance via RDP.

  • You should now be able to RDP into your instance with the password provided. Nothing is stopping you from changing the password to something that fits in with your password policy.
In part 2 we will be looking at adding more disks to the instance by making use of Elastic Block Storage (EBS)


Wednesday, 25 June 2014

Getting started with AWS S3 - Part 1

Recently I was looking for a solution to a problem, the problem being the lack of on-premise storage. If we can't store it on-premise then maybe we can store it off-premise right? I started investigated some options and came across the AWS Storage Gateway (more about that in a future post) and while doing so I learned that Amazon Web Services has so much more to offer! I decided to set up my own personal account and make use of the AWS free tier. The free tier offers you access to a few services on a monthly basis for a 12 month period. You will need to have a valid credit card but will not be charged unless you exceed the free tier capacity.

In the first part of this series we will have a look at S3 Simple Storage Service. This will give you 5 GB of standard storage, 20,000 Get requests and 2,000 Put requests under the free tier. To get started you will need to login into your AWS account. Select S3 from the services in your console.
  • Click the blue create button
  • Enter a bucket name and select region. I chose the Sydney region as it is closest to my location.
    A region is made up of availability zones (AZ) which are basically datacenters within a region. These are interconnected by high speed links and provide redundancy for your stored data.
  • Click create and your bucket will be available
  • If you like things organized you can create folders. Click the create folder button and name your folder. Ensure you click the tick mark to save.
  • Now we need to upload some data. Go into your new folder and select upload from the actions menu.
  • Select a file on your workstation and upload to your bucket
  • Select your file and click the properties button on the far right

  • If you click the link under properties (next to padlock) you will get an access denied message. By default all objects are not publicly available. Right-click the object and select make public.

  • Try the link again and this time it will be accessible. Try for yourself :-)
We can also give permissions to an entire folder by making use of AWS policies. When you upload content afterwards the object should inherit the permission.
  • Select your bucket and go to properties. Under permissions section, click Add Bucket Policy.
  • The bucket policy editor will open. Select AWS Policy generator in lower left corner.
  • On the Policy Generator page you will need to enter following values:
    • Type of Policy: S3 Bucket Policy
    • Effect: Allow
    • Principal: *
    • Actions: GetObject
    • ARN: arn:aws:s3:::your-­‐bucket-­‐name/folder/*

       
  • Click Add Statement
  • The statement is added and you can now generate policy.
  • The policy is generated and you will need to copy contents to clipboard.


  • Go back to the bucket policy editor and paste the contents you previously generated. Hit the enter key if you find that Save button is greyed out.


  • Upload a new file to your folder and click its link under the object properties. You should be able to access the file in your browser. If not, double check for syntax mistakes in your policy

And with this my first blog post on AWS has come to an end. In part 2 we will talk about encryption, redundancy and archiving.