Assuming you have your cluster up and running the next thing to do is log into your CE PRISM interface. What you will notice is that you do not have a storage pool configured
- Go to Home > Storage menu
- Click create container link and add a name
- No storage pool exists yet so click the + sign
- Add a name for your pool and assign all available storage. Click Save
- I am not going to enable any of the advanced features at this stage so will just click save
- Under Storage > Storage Pools I can see in the summary that my pool and container have been created
- To create a VM we will need access to an ISO. We will store the ISO on the CVM. First step is to create another container for storing the ISO. Go Home > Storage and create container. I did set the advertised capacity to 20 Gb for this container.
- To allow the upload of an ISO we will need to allow the host that holds the ISO access to the CVM. This can be done by making use of a Filesystem Whitelist.
- Add the subnet that holds the source host and click add
- You can now mount the NFS share from a Linux or Windows host. As I have no Linux host handy I will just use Windows by enabling the Windows NFS Client first.

- We can now copy the desired iso via windows explorer to the ISO datastore on the CVM. Alternatively you can save yourself some effort and use something like WinSCP to copy the files.
- You will also need to upload the KVM Virtio drivers so that the KVM virtual hardware is properly recognized. You can download the drivers from here
- Before we go on to create the VM we will need configure some networking. Go Home > VM > Network config. Create network by specifying VLAN. I am not enabling IP address management as I want to control that part outside of Acropolis. I am assigning the native VLAN 0 ID
- Now we are ready to create VM. Go to Home > VM > Create VM. Enter a name and the desired compute configuration
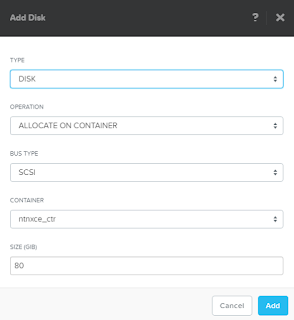
- You also will have to add a disk for your VM. Click add disk and specify configuration.
I want the disk to be stored in the ntnxce_ctr container and 80 GB should be plenty for my VM - We need to mount the ISO to the VM. Click on the CD ROM and edit settings. Ensure you specify "clone from ndfs file" and the correct path to iso
- We also need to make the VirtIO driver available to the VM. This is easiest done by adding a second CD-ROM. Click add disk and specify settings as follows
- We also need to assign a nic to the VM. Click add nic and select the VLAN you set up earlier on in the process.
- Select VM in Prism and power on. Once it has been powered on open the console.
- You are now ready to install Windows
- Once you get to the part asking where to install windows you will notice no disk is available. This is where the VirtIO driver comes in
- Click Load Driver and browse to the mounted ISO. Select the correct folder for your OS.
- Click OK. The driver should be detected. Click next.
- The drive is now detected. You can continue with install
- Once the install has been completed you will notice that no network connections are available. Go to Device Manager and check for Other devices
- Select the ethernet controller and browse to the VirtIO ISO. Update the driver
- Update the driver for the PCI device. This will install teh balloon driver
- All that is left to do for me is to assign static IP configuration as I am not letting Acropolis deal with the IP management nor do I make use of DHCP.
- We have connectivity
We know have Windows 2012 running on KVM running Nutanix CE running on ESXi 5.5 running on HP Hardware and with that we come to the end of this post.
I will definitely do another post where we go over advanced features.
I will definitely do another post where we go over advanced features.


This comment has been removed by a blog administrator.
ReplyDelete